Introduction
Welcome back to the second part of our series on leveraging Apigee as a powerful API Management platform for Large Language Models (LLMs)! In Part 1 of this guide, we explored the compelling reasons and architectural advantages of positioning Apigee as a unified gateway for interacting with diverse LLM providers. We discussed how Apigee enhances security, streamlines integration, optimizes performance, and provides crucial analytics and monetization capabilities for your AI-powered applications.
Now, it’s time to get hands-on! This tutorial will guide you through the practical steps of implementing the solution we discussed. We’ll start by setting up the backend service that directly interacts with various LLMs (Gemini, OpenAI, Anthropic Claude), then configure Apigee to act as the intelligent gateway, and finally, connect a simple frontend application to demonstrate the end-to-end flow.
Target Audience: This tutorial is designed for developers, API architects, and AI engineers who have a good understanding of Google Cloud Platform (GCP), Apigee concepts, and Python.
Prerequisites:
- A Google Cloud Platform (GCP) project with billing enabled.
- An Apigee instance provisioned in your GCP project.
- Basic familiarity with the
gcloudCLI. - Python 3.8+ installed on your local machine.
- API keys for Gemini, OpenAI and Anthropic (if you plan to use those LLMs).
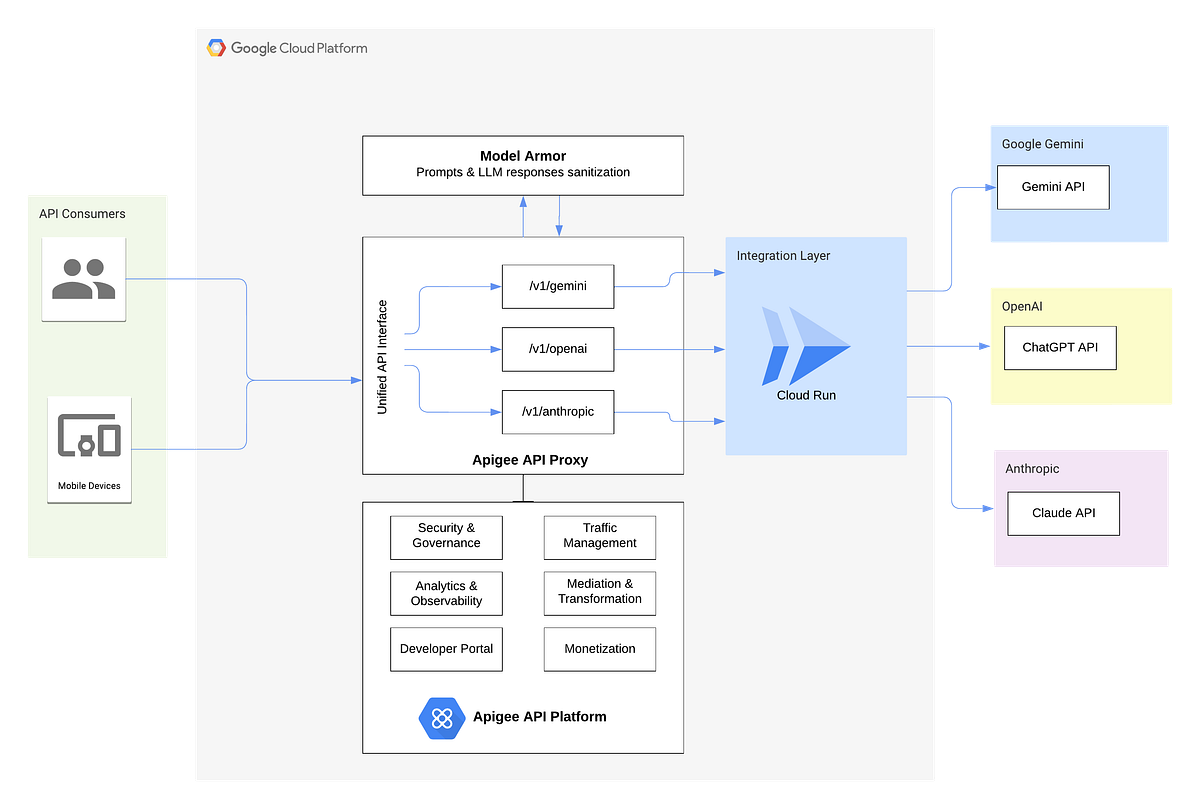
By the end of this tutorial, you’ll have a functional Apigee-powered LLM gateway, ready to be extended and customized for your specific needs. Below is the architecture we will be implementing.
The complete source code for this tutorial is available on GitHub:
https://github.com/apigeekk/apigee-llms-gw
Before you begin, clone this repository to your local machine:
git clone https://github.com/apigeekk/apigee-llms-gw.git

cd apigee-llms-gw
⚠️ Disclaimer: The code above is provided for demo purposes only. It is not intended for production use. Use at your own risk.
1. The LLM Integration Backend Service (Google Cloud Run)
At the heart of our LLM gateway solution is a lightweight backend service responsible for abstracting the direct interactions with different LLM providers. This service, deployed on Google Cloud Run for its scalability and serverless nature, acts as a centralized point for sending prompts and receiving responses from Gemini, OpenAI’s GPT models, and Anthropic’s Claude.
1.1. Service Overview
The Python code (main.py) powers this backend service, built using Flask to handle incoming HTTP requests and route them to the appropriate LLM.
The full source code of this service is available in the GitHub repository under the cloudrun-integration/ directory.
Key Responsibilities:
- LLM Routing & Interaction: our service in
main.pydefines separate Flask routes (/gemini,/openai,/anthropic) to handle requests for different LLM providers. Each route calls a dedicated function (e.g.,get_gemini_response,get_chatgpt_response,get_calude_response) that implements the specific API client calls and data parsing for its respective LLM. For Google Gemini, OpenAI (GPT models), and Anthropic (Claude models), theapi_keyis passed in the request payload and used by the respective API clients. - Prompt Sanitization Utility (
/sanitizePromptendpoint): our Cloud Run service also exposes a/sanitizePromptendpoint. This utility endpoint is designed to interact with Google’s Model Armor API to perform real-time scanning of user prompts. Crucially, the LLM-specific handlers (/gemini,/openai,/anthropic) in thismain.pydo not directly call this sanitization logic; instead, Apigee will orchestrate the sanitization step as part of its pre-processing. This will be covered later on. - Response Normalization: Each LLM interaction function extracts the relevant response text and token usage, wrapping them in a consistent JSON format (
response,tokens_count).
The full list of Python libraries necessary for the Flask application to run can be found in therequirements.txt file.
The Procfile specifies the command that Gunicorn should execute to start the web service. Cloud Run automatically detects and uses this file.
1.2. Deploying to Google Cloud Run with Authentication
Now, let’s deploy this service to Google Cloud Run, ensuring it only accepts authenticated requests. This assumes you have the Google Cloud SDK installed and configured.
- Enable Necessary APIs: Ensure the Cloud Run API, Artifact Registry API, and Cloud Build API are enabled in your GCP project.
gcloud services enable run.googleapis.com cloudbuild.googleapis.com artifactregistry.googleapis.com
- Navigate to Your Project Directory: Open your terminal or command prompt and navigate to the
cloudrun-integrationdirectory within the cloned GitHub repository.
cd cloudrun-integration
- Deploy the Service (Requiring Authentication): To make your Cloud Run service require authentication, omit the
--allow-unauthenticatedflag. Cloud Run services are private by default when this flag is not used.
gcloud run deploy <SERVICE_NAME> --source . --region <YOUR_GCP_REGION>
<SERVICE_NAME>: This will be the name of your Cloud Run service.--source: Tells Cloud Run to build and deploy from the current directory.<YOUR_GCP_REGION>: Your favorite GCP region (e.g., us-central1, europe-west1).
Important: After this deployment, direct calls to your Cloud Run service URL without proper authentication (e.g., an ID Token) will be rejected. This is the desired secure behavior.
Once deployed, the command output will provide the Service URL for your Cloud Run service. It will look something like https://service_name-xxxxxxx-uc.a.run.app. Make sure to copy this URL, as you’ll need it when configuring your Apigee proxy.
1.3. Service Account Permissions for Model Armor
The interaction with Google Gemini (via Vertex AI) and Model Armor within your Cloud Run service typically leverages the Cloud Run service’s default service account. For these interactions to succeed, this service account (usually in the format PROJECT_NUMBER-compute@developer.gserviceaccount.com) needs the appropriate IAM role :
Model Armor User(roles/modelarmor.user)
You can grant this role via the GCP Console (Navigate to IAM & Admin > IAM) or using the gcloud CLI as shown below:
gcloud projects add-iam-policy-binding <YOUR_GCP_PROJECT_ID> \
    --member="serviceAccount:PROJECT_NUMBER-compute@developer.gserviceaccount.com" \
    --role="roles/modelarmor.user"
Note: It is considered best practice not to use the default service account. Instead, create a dedicated service account for this purpose and assign it the required role. The default service account is used here for demonstration purposes only.
2. The Apigee API Platform Layer
With our LLM integration service deployed and securely configured on Cloud Run, the next critical step is to set up the Apigee API Platform. Apigee will act as the intelligent intermediary, handling client requests, applying security policies, generating authentication tokens for the Cloud Run service, routing to the correct LLM backend, and orchestrating advanced features like prompt sanitization and token accounting.
2.1. Apigee API Proxy Structure
The apigee/apiproxy/apigee-llms-gw-api.xml file defines the overall structure of our Apigee API proxy. This is the main definition that ties together all the policies, proxy endpoints, and target endpoints.
Note: This API proxy also includes a shared flow used for prompt sanitization, which we will cover in detail below. First, you need to create the shared flow in Apigee, and then create the API proxy using the assets provided in the GitHub repository.
Here is an overview of our API proxy:
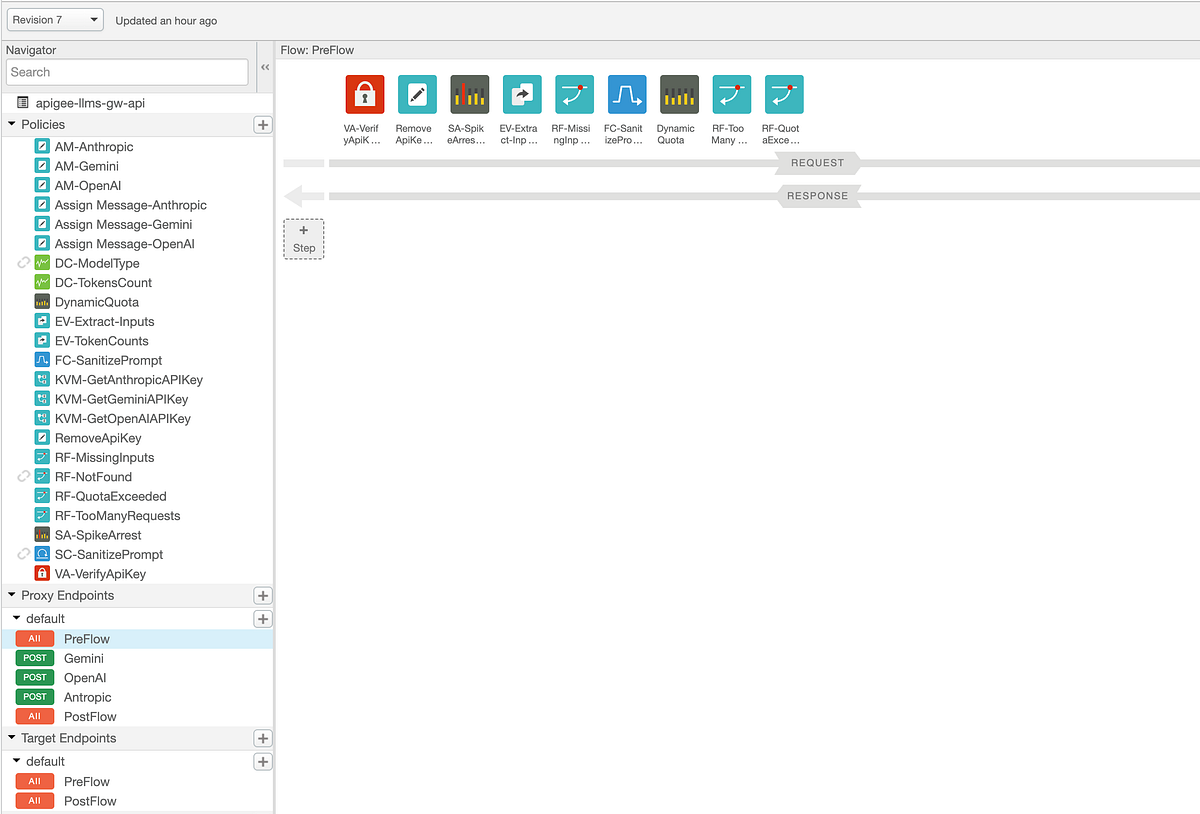
How does it work?
In short, the request first arrives and is checked for a valid API key. It then goes through a rate limiting policy, after which relevant inputs such as the user prompt and LLM type are extracted. If any of these required inputs are missing, an error is thrown and returned to the API client.
If the inputs are valid, Apigee checks whether prompt sanitization is needed based on the API products associated with the provided API key. If sanitization is required, a shared flow is triggered, which performs prompt sanitization by making a service callout to our previously deployed Cloud Run service. This service uses Cloud Armor to evaluate the prompt and returns a final verdict to Apigee.
Depending on the request endpoint (/gemini, /openai, /anthropic), the relevant API key is retrieved from an encrypted Key Value Map (KVM). The request is then forwarded to our Cloud Run service, which routes it to the appropriate LLM, retrieves the response, and sends it back to Apigee. Finally, Apigee extracts token usage (if the request was successful) and returns the response to the API client.
2.2. Apigee Proxy Policies: In-Depth Explanation
Now let’s delve into the individual Apigee policies that enforce and manage the flows within our apigee-llms-gw-api proxy. The full configuration for each policy is available in the GitHub repository under apigee/apiproxy/policies/ and apigee/sharedflowbundle/policies/.
- Proxy Endpoint Configuration (
apigee/apiproxy/proxies/default.xml): This XML defines the client-facing interface of your API proxy. It specifies the base paths and sets up conditional flows that direct incoming requests to different LLM-specific processing paths based on the URI suffix (e.g.,/gemini,/openai) and HTTP method. It also attaches policies to these flows, controlling the execution order for request pre-processing and response post-processing. VA-VerifyApiKey: This VerifyAPIKey policy is fundamental for client authentication. It validates the API key provided by the client against registered developer apps and API products in Apigee, ensuring only authorized applications can access your LLM gateway.
<VerifyAPIKey continueOnError="false" enabled="true" name="VA-VerifyApiKey">
  <DisplayName>VA-VerifyApiKey</DisplayName>
  <APIKey ref="request.header.apikey"/>
</VerifyAPIKey>
DynamicQuota: This Quota policy dynamically enforces request limits based on the attributes defined in the API Product associated with the client’s API key. This allows for tiered access where different products can have different maximum requests per interval. If the quota is exceeded, the proxy raises anRF-QuotaExceededfault.
<Quota continueOnError="false" enabled="true" name="DynamicQuota" type="calendar">
  <DisplayName>DynamicQuota</DisplayName>
  <Interval ref="verifyapikey.VA-VerifyApiKey.apiproduct.developer.quota.interval">1</Interval>
  <TimeUnit ref="verifyapikey.VA-VerifyApiKey.apiproduct.developer.quota.timeunit">minute</TimeUnit>
  <Allow countRef="verifyapikey.VA-VerifyApiKey.apiproduct.developer.quota.limit"/>
</Quota>
SA-SpikeArrest: This SpikeArrest policy protects our Cloud Run service from sudden traffic surges. It limits the number of requests processed within a very short window, preventing your LLM services from being overwhelmed by unexpected bursts of traffic. If the limit (2 requests/second in our case) is exceeded, anRF-TooManyRequestsfault is raised.
<SpikeArrest continueOnError="false" enabled="true" name="SA-SpikeArrest">
  <DisplayName>SA-SpikeArrest</DisplayName>
  <Rate>30pm</Rate>
</SpikeArrest>
GetGeminiAPIKey(and similar for OpenAI, Anthropic): These KeyValueMapOperations policies are used to securely retrieve LLM API keys from an Apigee encrypted Key Value Map (KVM) namedhib-kvm. This practice avoids hardcoding sensitive API keys directly in the proxy configuration.
<KeyValueMapOperations name="GetGeminiAPIKey" mapIdentifier="hib-kvm">
  <DisplayName>KVM-GetGeminiAPIKey</DisplayName>
  <Scope>environment</Scope>
  <Get assignTo="private.gemini_apikey">
    <Key><Parameter>gemini_api_key</Parameter></Key>
  </Get>
</KeyValueMapOperations>
Note: You must create an encrypted KVM (e.ghib-kvm) in your Apigee environment and populate it with keys gemini_api_key, openai_api_key, and anthropic_api_key.
Assign-Message-Gemini(and similar forAssign-Message-Open,Assign-Message-Anthropic): This specific AssignMessage policy is responsible for dynamically setting thetarget.urlto the correct Cloud Run backend endpoint (e.g.,/gemini). This allows Apigee to route the request to the appropriate LLM handler in our Cloud Run service.
<?xml version="1.0" encoding="UTF-8" standalone="yes"?>
<AssignMessage continueOnError="false" enabled="true" name="Assign-Message-Gemini">
  <DisplayName>Assign Message-Gemini</DisplayName>
  <Properties/>
  <AssignVariable>
    <Name>target.url</Name>
    <Value>[CLOUD_RUN_SERVICE_URL]/gemini</Value>
    <Ref/>
  </AssignVariable>
  <IgnoreUnresolvedVariables>true</IgnoreUnresolvedVariables>
  <AssignTo createNew="false" transport="http" type="request"/>
</AssignMessage>
Note: Replace CLOUD_RUN_SERVICE_URL with your actual Cloud Run service URL from the previous step. Do the same for Assign-Message-Open, Assign-Message-Anthropic.
AM-Gemini(and similar forAM-Open,AM-Anthropic): This AssignMessage policy is used to construct the JSON request payload that will be sent to our Cloud Run backend. It injects necessary parameters such as the LLM model, the user prompt, the API key (retrieved from KVM), themax_output_tokens(from API Product attributes), and the Model Armor template URL.
<?xml version="1.0" encoding="UTF-8" standalone="yes"?>
<AssignMessage continueOnError="false" enabled="true" name="AM-Gemini">
  <DisplayName>AM-Gemini</DisplayName>
  <Properties/>
  <Add>
    <Headers>
      <Header name="X-Api-Key">{private.gemini_apikey}</Header>
      <Header name="X-Max-Output-Tokens">{verifyapikey.VA-VerifyApiKey.apiproduct.operation.attributes.max_output_tokens}</Header>
    </Headers>
  </Add>
  <Set>
    <Payload contentType="application/json">
            {
                "model": "{urirequest.model}",
                "prompt":"{urirequest.prompt}"
            }
        </Payload>
  </Set>
  <IgnoreUnresolvedVariables>false</IgnoreUnresolvedVariables>
  <AssignTo createNew="false" transport="http" type="request"/>
</AssignMessage>
DC-TokensCount: This DataCapture policy extracts thetokens_countfrom the backend’s successful response. This value is then recorded into a Data Collector nameddc_llm_used_tokensfor analytics and potential monetization purposes.
<DataCapture name="DC-TokensCount" continueOnError="false" enabled="true">
  <Capture>
    <DataCollector>dc_llm_used_tokens</DataCollector>
    <Collect ref="apigee.tokens_count"/>
  </Capture>
  <Condition>response.status.code = 200 </Condition>
</DataCapture>
DC-ModelType: This DataCapture policy captures the LLM model type used in the request (e.g.,gemini-1.5-flash,gpt-4). This data is stored in thedc_model_typeData Collector, allowing you to analyze usage patterns per model.- Fault Handling Policies (
RF-NotFound,RF-MissingInputs,RF-TooManyRequests,RF-QuotaExceeded): These RaiseFault policies are used to handle various error conditions gracefully. When a specific error occurs (e.g., API key missing, quota exceeded, or internal server errors), these policies construct and return an appropriate HTTP status code and custom error message to the client, providing clear feedback. The full XMLs for these policies are in the GitHub repo. EV-Inputs&EV-TokenCounts: These ExtractVariables policies are used to parse and extract specific data from incoming request parameters (e.g., prompt, model) and outgoing response data (e.g.,tokens_countbefore it’s passed toDC-TokensCount). This allows Apigee to create accessible flow variables from parts of the request or response. The full XMLs are in the GitHub repo.
2.3. Apigee Service Account for Cloud Run Invocation
Since our Cloud Run service is configured to accept only authenticated requests, Apigee needs a way to authenticate itself when calling it. This is achieved by having Apigee generate a Google ID token signed by a specific Google Cloud Service Account and including it in the Authorization header of the request to Cloud Run.
Steps to prepare your Service Account:
- Create a dedicated Service Account for Apigee: It’s a best practice to create a service account specifically for Apigee to invoke your Cloud Run service. Navigate to IAM & Admin > Service Accounts in the GCP Console and create a new service account (e.g.,
apigee-cloudrun-invoker). - Grant Cloud Run Invoker role: Grant this new service account the
Cloud Run Invokerrole (roles/run.invoker) on your GCP project. This permission allows it to make authenticated calls to your Cloud Run services. Replace<YOUR_GCP_PROJECT_ID>with your actual project ID.
gcloud projects add-iam-policy-binding <YOUR_GCP_PROJECT_ID> \
    --member="serviceAccount:apigee-cloudrun-invoker@<YOUR_GCP_PROJECT_ID>.iam.gserviceaccount.com" \
    --role="roles/run.invoker"
Important Note for Deployment: When deploying your Apigee proxy, you will need to provide the email of this service account (apigee-cloudrun-invoker@<YOUR_GCP_PROJECT_ID>.iam.gserviceaccount.com) in the Apigee UI (or via CLI/Mage/Maven if using those tools) to allow Apigee to use it for generating ID tokens to our Cloud Run service.
2.4. Configuring Model Armor Template for Prompt Sanitization
Before setting up your Apigee proxy and API Products, you need to configure your Model Armor template. This template defines the specific content filters and confidence levels that will be applied to user prompts for sanitization. Our Cloud Run backend’s /sanitizePrompt endpoint will call this Model Armor service.
- Set Environment Variables: Open your terminal and set the following environment variables.
export TEMPLATE_ID=<PROJECT_ID> #e.g. my-apigee-llm-template2"
export LOCATION=<GCP_REGION> # Or your desired region for Model Armor (check documentation) )
export PROJECT_ID=<PROJECT_ID> # Replace with your GCP Project ID
export GCLOUD_AUTH_TOKEN=$(gcloud auth print-access-token)
echo "Using Project ID: $PROJECT_ID"
echo "Using Location: $LOCATION"
echo "Generated Access Token: $GCLOUD_AUTH_TOKEN"
- Create a Model Armor Template: Initially, create a basic Model Armor template. This task can also be done manually in the GCP console.
curl -X POST \
  -d "{'filter_config': {} }" \
  -H "Content-Type: application/json" \
  -H "Authorization: Bearer $GCLOUD_AUTH_TOKEN" \
  "https://modelarmor.us-central1.rep.googleapis.com/v1alpha/projects/$PROJECT_ID/locations/$LOCATION/templates?template_id=$TEMPLATE_ID"
- Update the Model Armor Template with Filters: Now, update the template with specific content filters and their confidence levels, enabling PI & Jailbreak filtering, malicious URI filtering, and SDP settings. Under
modelarmor/template.jsonyou will find the template I used for this tutorial.
# See cloud-run-backend/modelarmor.py for the full curl command
curl -X PATCH \
-H "Authorization: Bearer $GCLOUD_AUTH_TOKEN" \
-H "Content-Type: application/json" \
-d '{ "filterConfig": { "raiSettings": { ... }, "piAndJailbreakFilterSettings": { ... }, ... } }' \
"https://modelarmor.us-central1.rep.googleapis.com/v1alpha/projects/$PROJECT_ID/locations/$LOCATION/templates/$TEMPLATE_ID?update_mask=filter_config"
- Note the Model Armor Template URL: The full URL to this configured Model Armor template’s
sanitizeUserPromptendpoint will be crucial. This is the URL that our Apigee API Product will store and pass to the Cloud Run service. This URL has the following format:https://modelarmor.us-central1.rep.googleapis.com/v1alpha/projects/<YOUR_GCP_PROJECT_ID>/locations/<LOCATION>/templates/<TEMPLATE_ID>:sanitizeUserPrompt
2.5. Prompt Sanitization: The PromptSanitization Shared Flow and API Product Tiering
This feature centralizes prompt validation and offers differentiated services based on API Products. Apigee invokes a Shared Flow named PromptSanitization for this task.
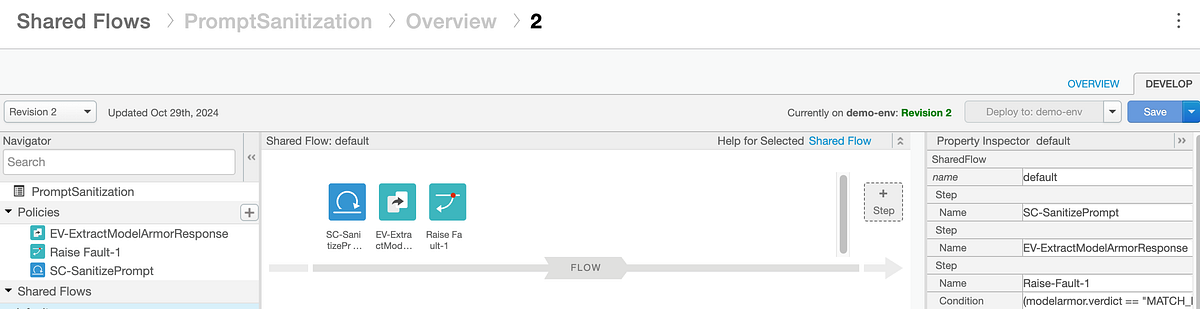
Our shared flow has the steps/policies shown below:
<SharedFlow name="default">
    <Step><Name>SC-SanitizePrompt</Name></Step>
    <Step><Name>EV-ExtractModelArmorResponse</Name></Step>
    <Step><Name>Raise-Fault-1</Name>
        <Condition>(modelarmor.verdict == "MATCH_FOUND") or (modelarmor.verdict == "ERROR")</Condition>
    </Step>
</SharedFlow>
Here’s a detailed explanation of the policies within this Shared Flow:
- Conditional Execution of
FC-SanitizePrompt: TheFC-SanitizePromptpolicy in our main proxy’s flow has a condition checking theModelArmorTemplatePathcustom attribute from the API Product. If an API key from the “Advanced” API product is used, this attribute is present, then the Shared Flow is executed. Otherwise, it’s skipped. SC-SanitizePrompt: This ServiceCallout policy makes an authenticated HTTP POST request to our Cloud Run/sanitizePromptendpoint. This is where the prompt is sent to our Cloud Run backend service for Model Armor sanitization. It includes a Google ID Token for secure, service-to-service authentication.
<ServiceCallout continueOnError="false" enabled="true" name="SC-SanitizePrompt">
    <DisplayName>SC-SanitizePrompt</DisplayName>
    <Request clearPayload="true" variable="myRequest">
        <Set><Payload contentType="application/json">
            { "prompt": "{urirequest.prompt}", "model_armor_template_url": "{verifyapikey.VA-VerifyApiKey.apiproduct.ModelArmorTemplatePath}" }
        </Payload></Set>
    </Request>
    <Response>calloutResponse</Response>
    <HTTPTargetConnection>
        <Authentication><GoogleIDToken><Audience useTargetUrl="true"/></GoogleIDToken></Authentication>
        <URL>[CLOUD_RUN_SERVICE_URL]/sanitizePrompt</URL>
    </HTTPTargetConnection>
</ServiceCallout>
Note: replace the CLOUD_RUN_SERVICE_URL with your Cloud Run service URL.
EV-ExtractModelArmorResponse: This ExtractVariables policy parses the JSON response received from theSC-SanitizePromptServiceCallout. It extracts theverdict(e.g.,NO_MATCH_FOUND,MATCH_FOUND,ERROR) and anymessagefrom Model Armor’s response, making these values available as Apigee flow variables (modelarmor.verdict,modelarmor.message) for subsequent policy decisions.
<ExtractVariables name="EV-ExtractModelArmorResponse">
    <Source>calloutResponse</Source>
    <VariablePrefix>modelarmor</VariablePrefix>
    <JSONPayload>
        <Variable name="verdict"><JSONPath>$.verdict</JSONPath></Variable>
        <Variable name="message"><JSONPath>$.message</JSONPath></Variable>
    </JSONPayload>
</ExtractVariables>
Raise-Fault-1: This RaiseFault policy is conditionally executed based on themodelarmor.verdictvariable. If Model Armor determines that a sensitive promptMATCH_FOUNDor anERRORoccurred during sanitization, this policy is triggered. It then returns a400 Bad RequestHTTP status code and an informative error payload to the client, preventing the harmful or invalid prompt from reaching the LLM.
<RaiseFault continueOnError="false" enabled="true" name="Raise-Fault-1">
    <DisplayName>Raise Fault-1</DisplayName>
    <FaultResponse>
        <Set>
            <Payload contentType="application/json">{ "error": "{modelarmor.message}" }</Payload>
            <StatusCode>400</StatusCode><ReasonPhrase>Bad Request</ReasonPhrase>
        </Set>
    </FaultResponse>
    <Condition>(modelarmor.verdict == "MATCH_FOUND") or (modelarmor.verdict == "ERROR")</Condition>
</RaiseFault>
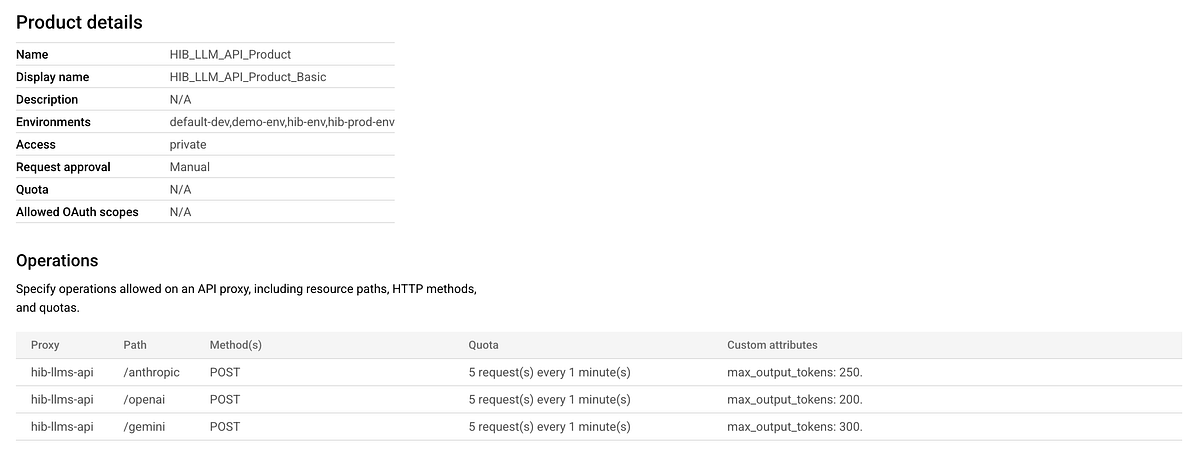
2.6. Defining API Products: Tiered Access and Capabilities
A key strength of Apigee is its ability to define and manage API Products. These products allow you to bundle your LLM APIs and offer varying levels of service, features, and quotas to different developer segments or use cases. You’ve created two distinct API products to showcase tiered access:
HIB_LLM_API_Product_Basic: Standard tier, basic access.HIB_LLM_API_Product_Advanced: Premium tier, enhanced capabilities like prompt sanitization and higher quota limits.
Apigee intelligently detects which API Product is being used at runtime based on the API key (via VA-VerifyApiKey) provided by the API client.
Steps to create your API Products in Apigee:
- Navigate to Publish > API Products in your Apigee UI.
- Click “+ API Product” to create each product.
- Configure each product as shown below, focusing on Operations (paths, methods, quota) and Custom Attributes.
Below is the configuration of our basic API product.
The advanced API product below includes a custom attribute that points to the Model Armor template used for prompt sanitization. You will need to replace this with your own template url.

By configuring API Products this way, Apigee dynamically applies policies like quota and conditionally executes prompt sanitization based on the API key.
3. The Frontend Application (Streamlit on Google Cloud Run)
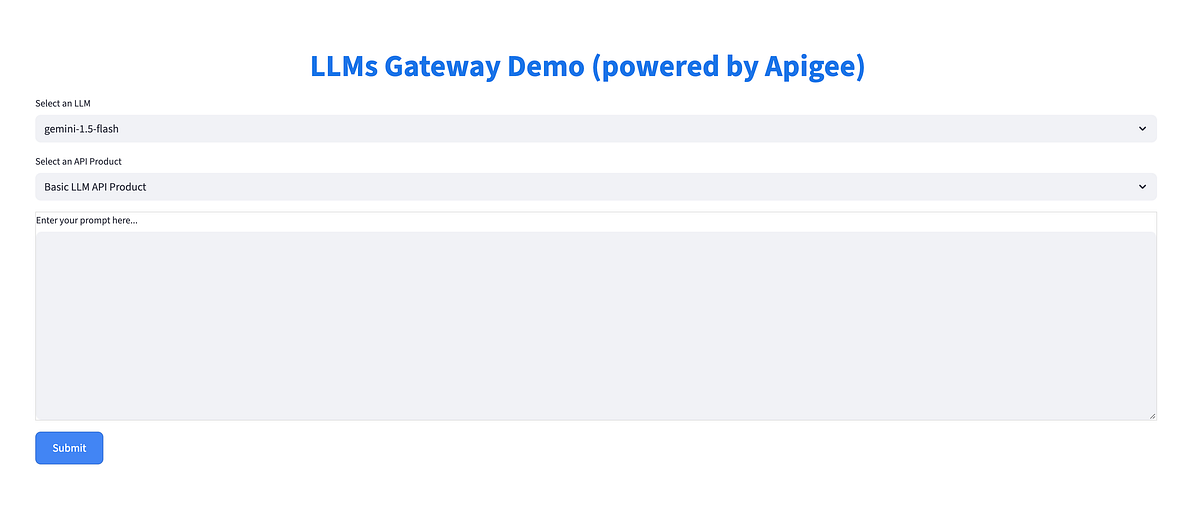
Our frontend is an interactive Streamlit application acting as the client. It allows users to select LLMs, input prompts, choose API product tiers, and send requests to your Apigee proxy.
This Streamlit application provides the user interface for interacting with your Apigee LLM Gateway.
The full source code for the Streamlit frontend is available in the GitHub repository under the frontend/ directory.
Key Responsibilities (Referencing app.py):
- User Interface: Provides UI widgets for selecting LLMs, API products, and inputting prompts.
- API Product Selection: Allows choosing “Basic” or “Advanced” API Products, which selects the corresponding API key from
config.py, demonstrating tiered capabilities. - Apigee Proxy Interaction: The
call_apifunction sends POST requests to our Apigee proxy, including the API key in theapikeyheader.
For this Streamlit application to call Apigee, it needs valid API keys linked to your API Products. As the next step, we will create two developer apps in Apigee in order to obtain API keys.
A. Create Developer Apps:
- Navigate to Publish > Developer Apps in your Apigee UI.
- Create two apps: “LLM App Basic App” (associate it with
HIB_LLM_API_Product_Basic) and “LLM App Advanced App” (associate it withHIB_LLM_API_Product_Advanced). - Copy the API key for each app.
- Update your
frontend/config.pyfile with these actual API keys and your Apigee Proxy Endpoint URL.
This config.py file stores sensitive or environment-specific information for local development and testing only.
apigee_endpoint: Base URL of your deployed Apigee proxy. Update this with your actual proxy host.apigee_api_key_basic: API key forHIB_LLM_API_Product_Basic.apigee_api_key_secure: API key forHIB_LLM_API_Product_Advanced.
Important Security Note: For production, externalize these sensitive values (API keys and endpoint URLs) using Google Cloud Secret Manager (most secure and recommended) or Cloud Run Environment Variables. Dot not commit them to a Github repository.
B. Deploying the Streamlit Frontend to Google Cloud Run:
Deploying the Streamlit application to Cloud Run makes it accessible as a serverless web application.
Navigate to the frontend/ folder directly and deploy the service using the commands below:
cd streamlit-frontend

gcloud run deploy <YOUR_SERVICE_NAME> --source . --region <YOUR_GCP_REGION> --allow-unauthenticated
Once deployed, open the Service URL for your Cloud Runservice in your browser. The UI is shown in the screenshot below
Note: Unauthenticated requests are allowed here for demonstration purposes only. For production environments, I recommend securing your Cloud Run service using GCP IAM or Identity-Aware Proxy (IAP).
5. Analytics and Monitoring: Gaining Insights into LLM Usage
Apigee’s analytics capabilities are crucial for managing LLM usage, controlling costs, and understanding consumption patterns.
5.1. Data Capture Policies for LLM Metrics
Our proxy includes DataCapture policies to extract and record key metrics:
DC-TokensCount: Captures total tokens used per interaction into a Data Collector nameddc_llm_used_tokens.
<DataCapture name="DC-TokensCount" continueOnError="false" enabled="true">
  <Capture>
    <DataCollector>dc_llm_used_tokens</DataCollector>
    <Collect ref="apigee.tokens_count"/>
  </Capture>
  <Condition>response.status.code = 200 </Condition>
</DataCapture>
DC-ModelType: Captures the LLM model type for analytics. The full XML is inapiproxy/policies/DC-ModelType.xml.
For the DataCapture policies above to work, we need to create two Data Collectors in Apigee as described below:
Data Collector dc_llm_used_tokens
- Name:
dc_llm_used_tokens - Display Name:
LLM Used Tokens - Type:
INTEGER
Data Collector dc_model_type
- Create
dc_model_type: - Name:
dc_model_type - Display Name:
LLM Model Type - Type:
STRING
5.2. Leveraging Custom Reports for Insights
Once data collectors are active, we need to create custom analytics report(s).
Create a new Custom Report:
- Metrics: Select
LLM Used Tokens (dc_llm_used_tokens). - Dimensions: Add
API Product,Developer App,Developer Email,LLM Model Type (dc_model_type), etc., to slice data. - Filters: Apply filters for specific data.
This visibility helps answer questions like:
- Token consumption by API Product tier?
- Which apps/developers use the most tokens?
- Token breakdown per LLM?
This deep visibility allows informed decisions on pricing, resource allocation, and API strategy. Furthermore, dc_llm_used_tokens is a powerful asset for monetization. By tracking token consumption, you can integrate this data with Apigee’s monetization features to establish usage-based pricing models, directly translating API usage into business value.
6. Testing the End-to-End Setup
Now that all components are deployed and configured, it’s time to test the entire LLM Gateway solution end-to-end.
Now that all components are deployed and configured, it’s time to test the entire LLM Gateway solution end-to-end.
1. Access the Frontend Application:
- Open your web browser and navigate to the Cloud Run Service URL of your Streamlit frontend (e.g.,
https://llms-frontend-xxxxxxx-uc.a.run.app).
2. Initial LLM Interaction:
- Select an API Product: Choose “Basic LLM API Product”.
- Select an LLM: Choose
gemini-1.5-flash. - Enter a Prompt: Type a simple, harmless prompt, e.g., “Tell me a fun fact about giraffes.”
- Click “Submit”.
- Verify Result: You should see a response from the Gemini LLM. Note the “Total tokens used”.
3. Monitor Apigee Trace Session (Highly Recommended!):
- In the Apigee UI, navigate to Develop > API Proxies >
apigee-llms-gw-api> “Trace” tab. - Click “Start Trace Session”.
- Send a few more requests from the Streamlit app.
- Observe the trace to see: Policy Execution, Flow Variables, and Target Request/Response.
- Stop Trace Session when done.
4. Test Quota Limits:
- In the Streamlit frontend, ensure “Basic LLM API Product” is selected.
- Rapidly send more requests than its quota (e.g., 5 requests/minute).
- Expected Result: An Apigee error (e.g., “HTTP error occurred: 500 Server Error”) due to
RF-QuotaExceeded. Check Apigee Trace.
5. Test Rate Limiting (Spike Arrest):
- Attempt to send a very high volume of requests in a short burst (more than 2 requests/minute in our case)
- Expected Result: You should receive
429 Too many requestserrors from Apigee when theSA-SpikeArrestlimit is hit. VerifyRF-TooManyRequestsin the Apigee Trace.
6. Test Prompt Sanitization (Advanced API Product):
- In the Streamlit frontend, select “Advanced LLM API Product”.
- Try a “sensitive” prompt: Enter a prompt that your Model Armor template should flag (e.g., “What should do I with my NVDA call options?” for the FINANCE filter).
- Expected Result: An error from Apigee (e.g., “HTTP error occurred: Prompt failed sanity check due to the following filters: FINANCE”).
- Verify in Trace: See
FC-SanitizePrompt,SC-SanitizePrompt,EV-ExtractModelArmorResponse, andRaise-Fault-1execution.
7. Compare Quotas and Max Output Tokens (Basic vs. Advanced):
- Send requests with both “Advanced” and “Basic” API Products.
- Expected Result: The “Advanced” product should allow higher quotas and potentially larger
max_output_tokensas configured.
Conclusion
Congratulations! You have successfully implemented a robust and intelligent LLM Gateway using Apigee API Management. Throughout this two-part series, we’ve moved from understanding the architectural advantages to a hands-on deployment, demonstrating how Apigee acts as a powerful intermediary for your AI initiatives.
You’ve learned how to:
- Integrate diverse LLMs (Gemini, OpenAI, Anthropic) through a unified Cloud Run backend service.
- Securely expose LLM APIs via Apigee, leveraging API key verification and ID token authentication for Cloud Run.
- Implement sophisticated traffic management with dynamic quotas and spike arrest policies, adaptable to different API product tiers.
- Orchestrate advanced features like real-time prompt sanitization using Google’s Model Armor, ensuring responsible AI usage.
- Gain deep insights into LLM consumption through Apigee’s custom analytics and data collectors, paving the way for cost management and potential monetization.
This Apigee-powered LLM gateway provides a scalable, secure, and observable foundation for your AI-powered applications. It abstracts the complexity of multiple LLM providers, centralizes governance, and offers granular control over access and usage.
I encourage you to explore the provided GitHub repository, adapt this solution to your specific use cases, and further leverage Apigee’s extensive capabilities to unlock the full potential of your LLM integrations.
If you found this useful, please share it. Don’t hesitate to reach out with any questions.